In the last blog, we outlined what threshold-based blocking is and why Fastly is uniquely positioned to offer this evolution in blocking capability. Be sure to check it out before continuing, as its foundations are built upon in this blog, where I’ll offer guidance and methodologies for maximizing thresholds to match your organization’s needs.
Threshold-based blocking is the easiest way to decrease false positives and confidently move into blocking mode faster. It’s a major reason why almost 90% of our customers run us in full-blocking mode, whereas other WAFs average far less.
I always emphasize this to customers during onboarding: with Fastly’s Next-Gen WAF, you can instantly activate immediate-block mode to tighten the security net as much as possible, but we also understand that risk tolerance varies among customers. Fastly’s Next-Gen WAF offers a flexible approach that is especially valuable in today's dynamic cybersecurity landscape, where threats evolve rapidly, and one-size-fits-all solutions are often inadequate. This gradual approach ensures confidence without creating concerns of legitimate traffic disruptions. Let’s take a look at how you can leverage this feature.
Best practices for adjusting thresholds
Many customers begin lowering their thresholds as they validate how accurate the Next-Gen WAF is. I recommend following this simple three-step approach as you plan to adjust yours:
Determine initial risk aversion
Adopt a timeline and get started
Monitor after each adjustment until your optimal threshold is reached
By the end of this process, you will have a finely tuned Next-Gen WAF that aligns perfectly with their specific security requirements and risk profile.
Determine initial risk tolerance
The first step to adjusting your aggregated thresholds is to determine baseline threshold values based on your company’s risk tolerance scale. Using the table below, make initial bold strokes to reduce the aggregated attack threshold default:
Risk tolerance | Recommended starting threshold value |
|---|---|
0 - no risk aversion | Start with immediate strict blocking (1), no thresholding |
1 | 10% of the default |
2 | 20% of the default |
3 | 30% of the default |
4 | 40% of the default |
5 | 50% of the default |
6 | 60% of the default |
7 | 70% of the default |
8 | 80% of the default |
9 | 90% of the default |
10 - completely risk averse | Start with default out-of-the-box thresholds |
With initial defaults adjusted, it’s time to choose a timeline for adjusting your thresholds. This enables organizations to stay on the path to instant blocking while ensuring any impacts on legitimate traffic are minimized.
While I typically recommend a two-week window for adjusting aggregated thresholds, there are two approaches for building your timeline to consider.
A gradually tightened approach
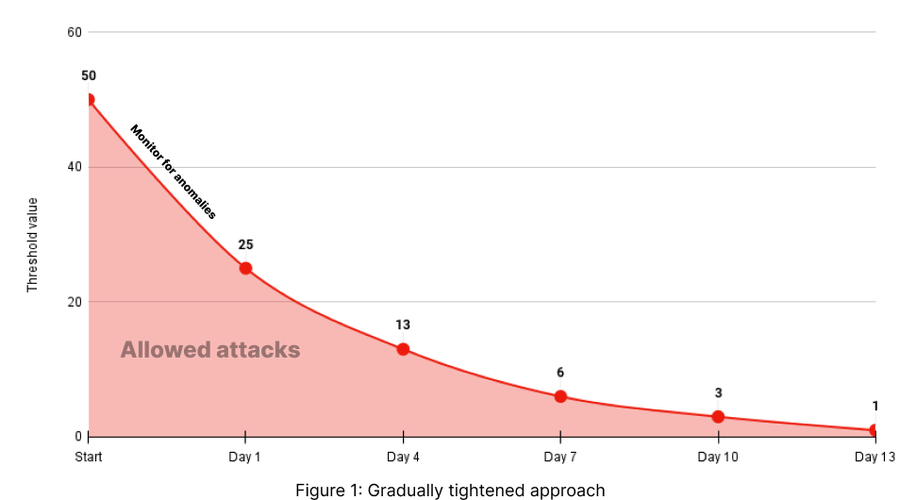
This approach starts from a broad net of detection using the threshold value obtained from the risk table above and reduces the threshold values by half every three days until the right threshold zone is reached. If your initial risk tolerance was relatively high (4-10), I recommend using a gradually tightened approach (figure 1).

Day 1: Initiate with a threshold setting of 50% of the baseline. This initial phase is about observing how the system responds to a moderately lenient setting.
Day 4: Progress to half the threshold value of day 1. By this stage, you should start seeing a reduction in unwanted traffic while maintaining accessibility for legitimate users.
Day 7: Progress to half the threshold value of day 4. This mid-point adjustment is critical for evaluating the impact of tighter security on traffic patterns.
Day 10: Adjust to half the threshold value of day 7. This stage is often where the balance between security and accessibility becomes most apparent.
Day 13: Finally, implement strict (immediate) blocking. This phase represents the culmination of the gradual tightening process, where the Next-Gen WAF operates at its highest vigilance level.
A strict, then refined approach
Another approach is to start from a strict net of detection beginning from the threshold value you obtained earlier and increase the threshold values every three days until the right threshold zone is reached. This approach is typically helpful for organizations with relatively high-risk tolerance (1-3) who opted to jump into immediate-blocking mode or an adjacent from the get-go. This can be any time you observe an anomaly or potential false positive based on your analysis of the request logs. If nothing is uncovered by the timeline’s interval, reduce the threshold by 50% until instant-blocking is reached (if not already there).
Throughout your refinement timeline, it's essential to keep a close eye on the system's performance and the nature of the traffic. These observations will inform whether the thresholds need further adjustments or if the current settings are optimal. Let’s take a look at the observability tools Fastly offers to ensure nothing gets missed.
Monitoring traffic for informed aggregated threshold refinements
Fastly provides all Next-Gen WAF customers with easy-to-use observability tools to track how their aggregated threshold refinements are impacting legitimate traffic. Between each threshold adjustment interval, I suggest you follow these steps to validate your Next-Gen WAF’s efficacy.
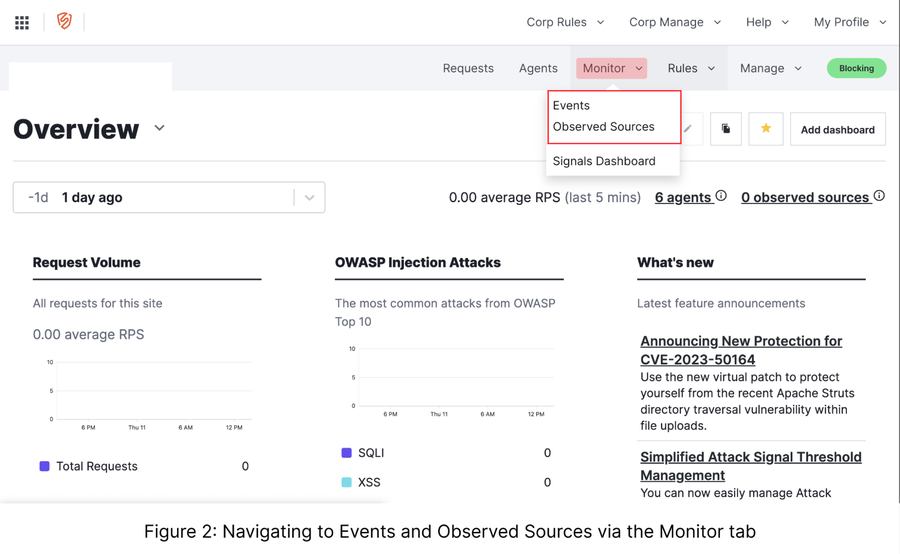
From the Monitor dropdown (Figure 2), you can quickly choose between two options:
Events: IPs that have currently exceeded the aggregated thresholds
Observed Sources: IPs that are approaching an aggregated threshold.

Using Events to ensure the accuracy of currently blocked IPs
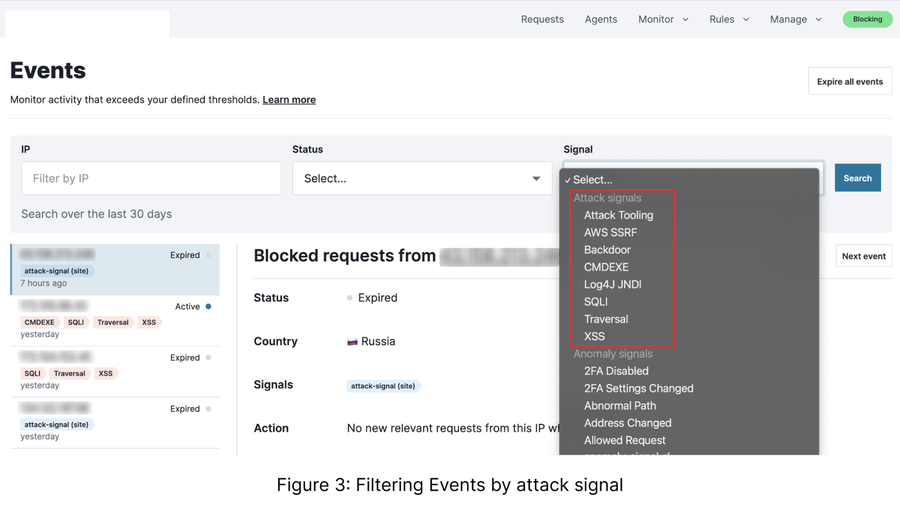
The Events tab features all of the IPs currently blocked from submitting additional attack payloads. By default, this page will show the totality of blocked IPs, which may include those that are being blocked from a rule or decision that lives outside the decision of your aggregated attack thresholds. To focus on just blocks created by aggregated thresholds, use the filter (figure 3) and scroll down to the “Attack Signals” section.

All attacks in this section are cumulative, so filter through each to look for anomalies before making a refinement to the aggregated threshold per your timeline.
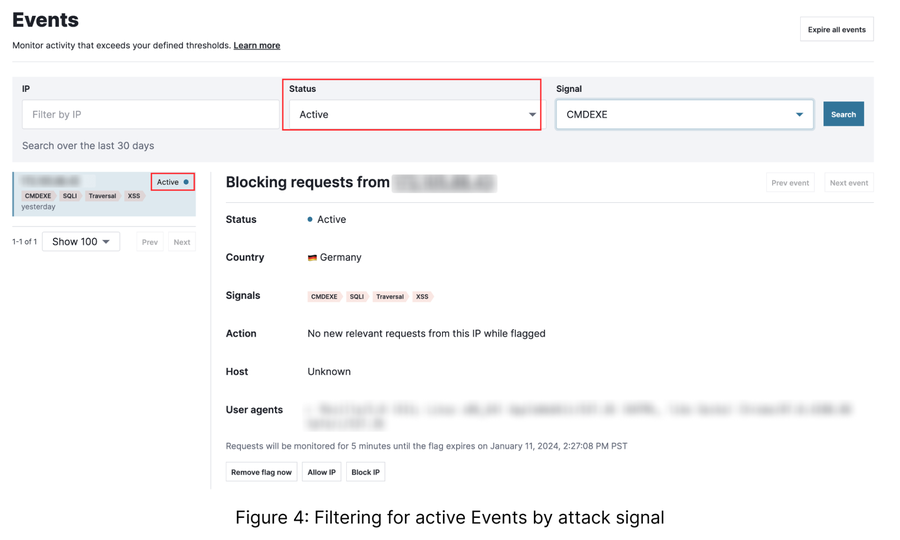
As you filter through each “Attack Signal,” you’ll likely find IPs that are actively blocked
(figure 4).

I suggest a quick spot-check to ensure that the blocking decisions appear legitimate. If you’re unsure, Fastly provides you with the ability to dig deeper into the actual request logs. This feature is invaluable for a meticulous examination of each request, helping you identify nuances and patterns that might not be apparent at a higher level. False positives are rare, but you may come across what appears to be one at some point in your refinement timeline. In those instances, open a support ticket, and our team will be happy to help.
Once you’ve moved through each and any anomalies have been cleared, repeat this process at least once at each interval to ensure there’s no impact on legitimate traffic.
Using Observed Sources to monitor IPs approaching blocking
The Observed Sources tab features all of the IPs that are currently approaching a block. Similarly to the Events tab, this will initially show insights that aren’t scoped to your need, so you’ll first click on “Flagged IPs” and then filter to the “Attack Signals” to ensure you’re monitoring the right activity. Once filtered on an “Attack Signal,” you can work through the same process used in the Events section if time and risk aversion align, or use it as a leading indicator and note how many IPs are in the list as they may turn into blocking decisions after the next interval’s refinement. By monitoring these two tabs, you’ll ensure increasingly effective security measures that limit the impact on legitimate traffic.
A relatively low number of IPs in the list is fine, but if it’s large, it may warn that after your next refinement, the Events tab will be far busier.
Moving past your aggregated threshold refinement timeline
At the conclusion of your timeline, you’ll likely be in or near instant-blocking mode – congratulations! While your work is done, it’s important to note that you don’t need to stay in instant-blocking mode 100% of the time. Now that you have confidence in the system, you may find it beneficial to adjust the thresholds to limit any possible impact during high-traffic sales like Black Friday.
For organizations seeking an even more stringent level of security in their environment, each “Attack Signal” noted in the Monitoring tab features its own threshold that can be adjusted and refined. By following a similar process to what’s noted above, you can keep your aggregated attack threshold higher while limiting attacks that are more prominent in your environment (thus catering the threshold to just what’s been observed to be the most prevalent).
The tools provided in Fastly’s Next-Gen WAF maximize your security posture by aligning perfectly with your specific security requirements and risk profile. By following the steps above, you can ensure confidence in the system as you optimize your security posture.
Not currently a customer? Contact us to leverage this feature and more within our Next-Gen WAF. If you are a current customer but need support maximizing your security posture, my team of Security Solutions Architects is happy to help. Please contact your Fastly Account Manager to learn more.

